Showing posts with label House Love. Show all posts

Thursday, July 9, 2015

Bathroom Reno | Two Months In

I know you all must be waiting on the edges of your seats to hear about the bathroom reno;)

Well, wait no longer. "We" (mostly Andrew!) have been making lots of progress in the past 8 weekends and I'm happy to share that we almost ready for paint and tile. Wahoo!!!

It's hard to believe that 8 weeks ago we were gutting this space and ridding our lives of fake red laminate cabinets, speckled floor, and an old grimy shower/tub combo.  Cue the "gross".

In the last 8 Saturdays and a smattering of weeknights since the big demo, we have focused on the stuff that you will never see. Electrical, ceiling beams, sub floors, plumbing, waste pipes, insulation and window framing. The "behind the scenes" are the most important but always the least interesting and creative (in my opinion).

Frankly, I am patiently waiting for that dreamy claw foot tub to be installed...

Installing all new plumbing and a new transom window 
Pocket door framing and new doorway framing | New electrical: dimmers, can lights, outlets
New plumbing: Waste pipe from roof to basement, shower, tub, toilet & sink 
Andrew single handedly sheet rocked the bathroom a few days ago and I am forever grateful. If I never sheet rocked again, I'd be fine with it! I feel like I'm at the point where I can check that off my life list. 

Mold resistant sheet rock installed for the walls and ceilings
12 sheets of sheet rock
Cement board installed for the shower tile
First coat of mud & tape
Our earlier prediction of a September or October finish date is looking improbable. If it weren't so hot, I'd say I'll be soaking in that claw foot tub by August!

Sunday, June 21, 2015

Top 5 House Loves

There are a lot of things in our home that I love.  Family heirlooms, trinkets from memorable experiences, photographs of events long gone but not forgotten, and pieces my husband has built with his own two hands.

That's the difference between a house and a HOME. Minimalism versus these things bring me conflict sometimes, but mostly they bring me joy. They define our style, our space, our little world in these 4 walls.

For two whole years our house has been a construction zone.  Sometimes in the midst of tearing out walls and navigating the sea of tools, I look to a few items for normalcy. Things that are just FUN - not sheetrock, wiring or insulation! (For the record, putting up sheetrock is NEVER fun).

These are a few of my house loves that keep me sane with all these house renovations.


Anchor Hooks | Chateau & Bungalow in Newport, RI


Wall Sconce | Barn Light Electric


Dunes Painting | Meadow Brooks Studio in Westport, MA


Rope Knot Lamp  | Pottery Barn


Monday, June 8, 2015

Money Pit Monday: Rub A Dub Dub in my Claw foot Tub


This late night edition of "Money Pit Monday" is brought to you by Rub a Dub Dub in my Claw foot tub. 

Can we just talk about claw foot tubs for a minute? I am obsessed. Deep tub, sexy curves, flattering feet, and independent of any shower. I have dreamt claw foot tubs since the day we moved into this house and I saw the ugggllly tub & surround. I immediately starting Pinteresting ideas for the new bathroom. The design centering around a gorgeous claw foot tub! Everything crisp, fresh, and clean looking. Lots of bubbles, candles and solitude are in my future. 

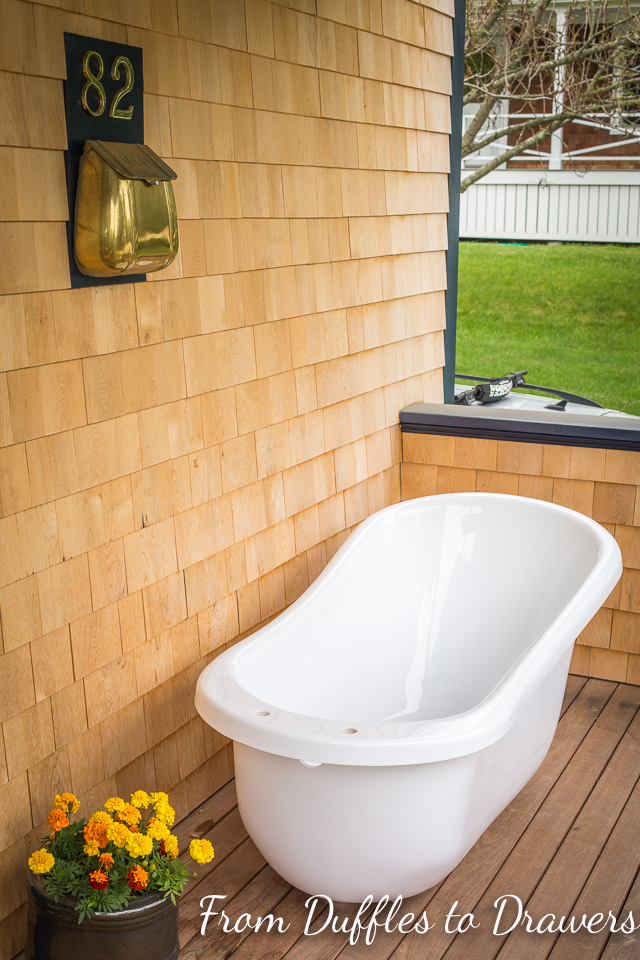
Fast forward two years and my design ideas are taking shape. We ordered this 62 inch Acrylic Claw Foot Tub from Vintage Tub & Bath and we could not be more thrilled. We debated on a cast iron vs. acrylic tub and it came down to how it would be installed. Should we have a fight carrying it up the stairs or make it civil?? We went for civil - 60 lbs vs. 330. A no brainer in our case. 


This weekend was all about fitting the new tub, running the pipes, and storing it for a few months down the road.  Mixed in there with a little building of a another raised garden bed and talking about the "punch list", this weekend was a productive house weekend. I can see the bubbles in my future...

Any guesses where the new tub resides now?!


Monday, June 1, 2015

Money Pit Monday: Green Thumbs


Andrew and I were Hercules, Superman, and Wonder woman all at the same time on Saturday. We rocked our house day and spent 9 hours of blissful productivity bringing this place closer to the "finished product" (btw…does anyone ever FINISH a house or is that just some dream they put in brochures and real estate magazines?!?).

House days for us can go one of two ways. Thankfully, this Saturday we worked together like champs - no bickering, no meltdowns, no big surprises. These kind of days make house work on a beautiful Saturday not only tolerable, but down right enjoyable.

Just a few weeks back we had given up the dream of a beautiful raised garden with lush, green vegetables. It was just not on the priority list. We were running out of time. Stress was mounting. The bathroom was gutted.

And then, out of the chaos and "unattainable", we got motivated. We switched priorities. We found the perfect window in time. We cleared out, found space, and made use of some free wood.  In a matter of 2 hours we had a nicely raked, raised garden bed.

First stop on the Saturday morning rounds was the landscaping supply store.  We loaded up 2 yards of 1/2 compost, 1/2 loam.  The only way I knew this was from a gardening guru friend who has paved the way for my newest, most ambitious hobby.  In no way do I even know what loam is, but that's beside the point, we have it in our raised bed and supposedly it will be good for my plants.

After a morning of shoveling, sweating and earning my "green thumb", we had 2 new flower beds, a window box, and some plants sprouting from our raised garden bed. I finally understood what all the fuss is about. Why people garden…why they find peace & joy in working in the dirt…why I am encouraged to try and keep something other than myself, alive.  I am hooked.


I earned my gardening badge, next up was the waste pipe.  

I don't know whether I found it comforting that Andrew bought a book on how to install piping or not. When you are installing the poop pipes, you kind of want to make 110% sure that everything goes as planned.  This had me nervous. Again, it all could have gone one of two ways.

If you don't count me breaking Andrew's thumb while shoving the pipe through the roof and almost causing him to fall off the ladder, everything miraculously went as planned...Just continuing the reno memories...


A few hours later, we had a new 19 foot PVC waste pipe from the rooftop all the way down to the basement. I can now add installing poop pipes to my resume. My parents should be so proud:) 

That about rounds out Money Pit Monday this week. Next week's riveting Saturday plans involve more piping, maybe some wiring, and installation of the new exhaust fan. Big stuff people, stay tuned! 


Monday, May 11, 2015

Demolition Derby


For most people, last weekend was about big hats, preppy bow ties and sundresses, and Mint Juleps with just the right amount of mint. The Kentucky Derby signals the start of summer and is as good a reason as any to throw a party. 

We threw a party, but it looked a bit different! We raised the bar high with crow bars, dust masks, dumpsters and bottles of beer! Demolition Derby was rockin'

We rolled out the red carpet with our 4th dumpster in 2 years. Parked it right below the bathroom window and started ripping. I couldn't get that sledgehammer into those walls fast enough. In less than 4 hours we had an empty space. 


Goodbye nipple light. Goodbye red laminate, awkward cabinets. Goodbye speckled floors. Goodbye moldy, cheap shower.


After 2 years of construction, we've come to not only anticipate problems, but expect them. The bathroom project had a few little surprises and one big inconvenient, no pun intended "oh shit" - evidence of mice and a cracked waste pipe. 


This Demolition Derby was a success! Big stuff is happening around here and we are open to any ideas! Find out next week how we plan to fix the waste pipe problem and what the new layout might look like!

Monday, March 2, 2015

MoneyPit Monday: Molding 101


Over the weekend Andrew and I had a molding party. Yes, our lives have come to this. We get excited over hanging molding and devote an entire Saturday to this beloved affair.

For me, molding is the sign of something good. The light is at the end of the tunnel. All truly hard manual labor is behind me (for this project!).  I can see the end in sight…the shiny paint, the moving of furniture, the nearness of a "normal" home that does not constantly resemble a construction zone. THIS is what molding means to me.

When we started this whole home renovation thing almost 2 years ago, we weren't super impressed with the options at Home Depot. We searched around, played with some ideas, then designed our own "signature" molding for the windows and doors in the back living room.  We have continued with this molding pattern throughout the upstairs.

We bought 1x5 pine boards from Home Depot and Andrew used his shaper with a molding bit to create a bead in the inner edges of each board. Then we added a piece of solid pine shingle molding to the outer edges of each piece.  Our baseboard molding is just a simple piece of pine with a cove molding that Andrew shaped. We have been super happy with the style of this molding for our doors and windows and think it's pretty simple.

So what else goes into putting molding up once you've designed or picked up the boards from Home Depot? Here's MondayPit Monday's Molding 101 and how we do it…

1. Prime all Molding (we use Sherwin-Williams Multi-purpose primer)


2. Organize tools:
  • Tape measure & pencil
  • Chop saw
  • Clamps
  • Air compressor & hose
  • 16 gauge nail gun & 2in galvanized finish nails
  • Phenoseal white caulk
  • Patch-n-Paint & putty knife

3. Measure out 1/4 inch from the edge of the door frame and mark with a pencil from the top to the bottom. Clamp the boards to the inside door frame (you may need to remove the actual door in order to do this). Nail both left and right side pine boards along these marks.


4. Measure and cut the top pieces of pine board to fit at an angle. If you don't have a bead, you can remove this step.

5. Measure, cut and nail all shingle molding pieces to the edge of the flat pine boards, 3 sides. It helps to start from the top edge and work your way down.


6. Sand the edges for any irregularities and bumps using 80 grit sandpaper, then 120 grit for smoothness.

7. Fill all edges & gaps with phenoseal (we call it "penis seal") and all nail holes with putty.


8. Light sand, then 2 coats of interior paint (we are using "Pure White" by Sherwin Williams in the ProClassic or Cashmere)

9. Touch up any spots on the walls that might have some molding paint splatters.

10. Step back and ENJOY the fruits of your labor!!!


When these 10 steps are completed, I do a happy dance. Y'all…it is a beautiful thing.  Finishing the molding is like crossing the finish line after struggling 26 miles in a marathon. You are simultaneously ecstatic that you even completed the race and exhausted beyond belief.  I feel like this after every room that we complete.  I also feel like how could I even muster up the energy and effort to do another room.  And then, as time wears on, like I imagine most marathon runners experience, you get the urge. You crave the adventure. You start again.


Monday, December 15, 2014

Moneypit Monday: Subfloors & hallways


If you've ever been to Europe you've certainly heard and seen the saying, "Mind the Gap". This weekend I felt like I was more or less getting on and off a train, "minding the gap" on each trip up and down the stairs!

Andrew decided at 8pm on Thursday night that it was the PERFECT time to rip up our hallway flooring and start the process of replacing it.  Yay!!! (insert sarcastic comment here).  Since we finished painting the hallway Wednesday night, I had a "normal" upstairs for about 24 hours.


We decided over a year ago that we would replace the hallway flooring once we finished the walls and before we put up trim and finished off the linen closet. The floor is worn down, splintering & patched in.  The stairs & landing are worth salvaging with some hand sanding & poly, but the upstairs hall has seen some serious abuse over the past 100 years. And not surprisingly so.

Once the pine boards were removed using a hammer, crow bar & some Budweiser, we were left with this…


Turns out our 100+ year old subfloor has just a few gaps and enough dust to start a time capsule. And speaking of time capsules, underneath the subfloor were the original pipes for the gas lighting of the house. How cool is that?!  They must not have been in use long since the durable, inexpensive light bulb that we know today was introduced in 1908.


And then, there was the dead mouse carcass. Also for the time capsule…


This weekend Andrew made his weekly trip to our home away from home, Home Depot, and purchased 5 sheets of 1/2" plywood. He created 2 layers for the new subfloor and I'd say it's much improved! This money pit project cost us less than $100 - taking the old flooring to the dump, screws & plywood and more Budweiser:) Next step is to purchase the new flooring at Downs & Reader.


Be on the lookout for the new flooring reveal when we return from the holidays!

Happy Moneypit Monday y'all!
 
Blogging tips