Monday, March 30, 2015

MoneyPit Monday: Linen Closet Debut

Sometimes life's best things are simple. 

Like neatly folded, crisp white towels. Big monograms (the bigger the better). Plush cabana striped beach towels.  And white sheets. Yep, that makes me swoon.

After a weekend of house work and looking at puppies (yep, I said it, a Coughlin dog is in the near future so stay tuned!), the linen closet's debut is here!

Y'all, this project started in January of LAST YEAR. Eeek. It's been a long time coming and the hall has been through many construction phases. 

THE PROGRESSION

The linen closet evolved after demolishing our bedroom and guest room last winter. Turns out there was some empty, wasted space next to the chimney. And y'all, we needed some storage space! Houses built in the 1900's were not built with the 2000's in mind. They were built for minimalists like my husband. 

So we reconfigured the layout upstairs and created this space, and what better place than a hall linen closet for those beautiful white towels??  


It still needs a door, but who cares?! We have a functioning linen closet after 13 months of being "under construction". That is a beautiful thing. 

Now the question remains...will my towels stay white with a carpenter, boat builder of a husband and a soon to be addition to our house, in the form of a dirty, furry puppy? 

Probably not, but here's to dreaming. 

Friday, March 20, 2015

Date Night: Sushi Style


Happy Friday everyone!!

Whew, its been a long week and with this snow on the way for the first day of spring, I'd say its a great night for a date night. Andrew and I are headed to Burlington, Vermont to ski for the weekend, but I wanted to share an awesome idea for a date night that we've now done twice.

We LOVE sushi. Fresh fish, fresh veggies, soft rice and yummy sake. What's not to like?! After being gone for over a month this winter, we have been wanting to hang around our house most weekends. So  I came up with a fun sushi date night.

Here's how we put this all together…(please ignore the ugly quality iPhone photos…)


Ingredients: Fish (salmon, shrimp, tuna etc.), Cucumber, Mango, Chives, Asparagus, soy sauce, sushi rice, wasabi, and sliced ginger. 

I ordered the nori sheets off Amazon. The rest of the ingredients are from our grocery store or the Asiana Food Market in Providence, RI. 


This rice cooker from Amazon has changed our world. The rice is done to PERFECTION!! 


Slice it all up nice and small. Make sure to have everything ready before you roll. 


I also ordered this Bamboo Sushi Rolling Kit from Amazon. Great buy! 


Line it all up with a few items. Then roll with the bamboo mat! 


Sake bombs: Shot glass of sake and a half glass of beer. Place your chopsticks on top of the beer glass, then your sake on top of that. Bang the counter/table and say, "Sakeeee bomb!" Drink it up. 


Did you know soy sauce is 40% wheat?! We go for the gluten free version, 100% soy sauce.


Yum! Sashimi!

Such a great night to eat some fresh, delicious food in the comforts of your own home:) Hope you guys have a great weekend! Let me know how your sushi date night goes!!! 

Thursday, March 12, 2015

DIY Polka Dot Tee Pee


Last night our nephews "Facetimed" us in the midst of fixing dinner. My heart melted as those two crazies laughed and chatted with Andrew and I. Benedict has even learned to say "Uncle Dandy" and to be honest, I about died. The sweet child cannot say "three" but he has "Uncle Dandy" down pat. We sure do know who we love, even at a young age.  

So today it got me to thinking about Benedict's DIY polka dot tee pee. Or in Benedict's vocabulary, his "pee pee". 

I am always after the perfect gift. This Christmas, (which seems like years ago!), I was on a strict budget but still wanted to find the perfect gift for everyone on my list. When it came time for Benedict's gift, I didn't want to give a toy that he wouldn't care about days later or an outfit that he would outgrow in a matter of seconds and I wanted something that could be neat for him to use when he visits Newport. Its hard finding a gift for a 2 year old. In reality, they'd prefer pots and pans and empty cardboard boxes. So I started scouring Pinterest and Etsy. The place of all great ideas. And I found THE perfect gift. 

A tee pee. A place where Benedict could hide away and read books, use his imagination, and escape from his older siblings. He really hadn't had any place of his own!

As I searched and searched I decided to build it myself. The ones online were either too expensive or too kid like. I wanted something he could grow into. So I pinned a few great tutorials on how to build a tee pee and off I went to Hobby Lobby. I settled on a grey and light khaki polka dot duct fabric for the tent and an antique like car duct fabric for his reading cushion. A lot of tutorials recommended either dowels or pvc pipes from Home Depot for the tent legs. I found the pvc pipes to be cheesy and the dowels to be too pricey. So I got Andrew to make them out of a 2x6 with his chop saw. He even was able to sand each edge and chop the bottoms at an angle for it to sit properly on the floor. A perfect solution!


As a sewing newbie, this project was challenging for sure, mostly because I am spatially challenged. I found cutting the triangles and sewing large amounts of fabric to be the hardest part, so if you want to attempt the project and don't have those issues, it should be a piece of cake! I recommend these tutorials from Dress this Nest and Pink Toes and Power Tools. I adjusted my measurements a bit to fit my tent poles (I made them slightly smaller) and for all my "oops" sewing mistakes. Once the tent was all put together, I made the simple reading cushion with a piece of foam and the car fabric, just like you would a pillow. 


TA DAHHH!!


When Benedict found out this tee pee was his very own...to keep...he made sure everyone knew that this was HIS "pee pee".  To be exact, I believe his words were...."My pee pee...Mine." All he wanted to do that night was read or nap in his "pee pee". He didn't want anyone else to come in HIS space. That reaction, that joy in his expressions, that love, that is what gifts are all about. 


I guess you could say that the DIY polka dot "pee pee" was a success. 


Monday, March 2, 2015

MoneyPit Monday: Molding 101


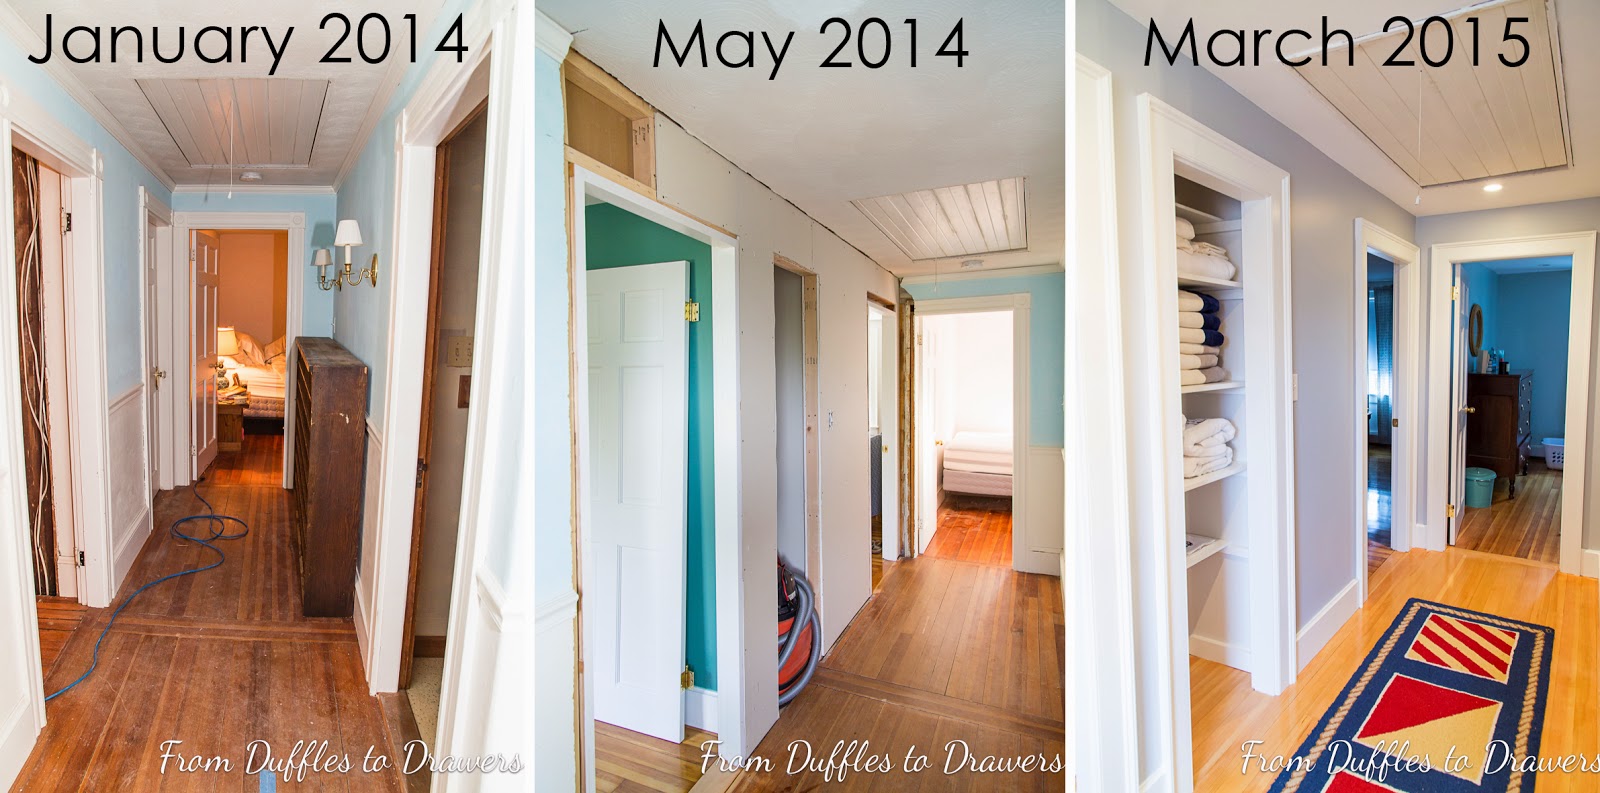
Over the weekend Andrew and I had a molding party. Yes, our lives have come to this. We get excited over hanging molding and devote an entire Saturday to this beloved affair.

For me, molding is the sign of something good. The light is at the end of the tunnel. All truly hard manual labor is behind me (for this project!).  I can see the end in sight…the shiny paint, the moving of furniture, the nearness of a "normal" home that does not constantly resemble a construction zone. THIS is what molding means to me.

When we started this whole home renovation thing almost 2 years ago, we weren't super impressed with the options at Home Depot. We searched around, played with some ideas, then designed our own "signature" molding for the windows and doors in the back living room.  We have continued with this molding pattern throughout the upstairs.

We bought 1x5 pine boards from Home Depot and Andrew used his shaper with a molding bit to create a bead in the inner edges of each board. Then we added a piece of solid pine shingle molding to the outer edges of each piece.  Our baseboard molding is just a simple piece of pine with a cove molding that Andrew shaped. We have been super happy with the style of this molding for our doors and windows and think it's pretty simple.

So what else goes into putting molding up once you've designed or picked up the boards from Home Depot? Here's MondayPit Monday's Molding 101 and how we do it…

1. Prime all Molding (we use Sherwin-Williams Multi-purpose primer)


2. Organize tools:
  • Tape measure & pencil
  • Chop saw
  • Clamps
  • Air compressor & hose
  • 16 gauge nail gun & 2in galvanized finish nails
  • Phenoseal white caulk
  • Patch-n-Paint & putty knife

3. Measure out 1/4 inch from the edge of the door frame and mark with a pencil from the top to the bottom. Clamp the boards to the inside door frame (you may need to remove the actual door in order to do this). Nail both left and right side pine boards along these marks.


4. Measure and cut the top pieces of pine board to fit at an angle. If you don't have a bead, you can remove this step.

5. Measure, cut and nail all shingle molding pieces to the edge of the flat pine boards, 3 sides. It helps to start from the top edge and work your way down.


6. Sand the edges for any irregularities and bumps using 80 grit sandpaper, then 120 grit for smoothness.

7. Fill all edges & gaps with phenoseal (we call it "penis seal") and all nail holes with putty.


8. Light sand, then 2 coats of interior paint (we are using "Pure White" by Sherwin Williams in the ProClassic or Cashmere)

9. Touch up any spots on the walls that might have some molding paint splatters.

10. Step back and ENJOY the fruits of your labor!!!


When these 10 steps are completed, I do a happy dance. Y'all…it is a beautiful thing.  Finishing the molding is like crossing the finish line after struggling 26 miles in a marathon. You are simultaneously ecstatic that you even completed the race and exhausted beyond belief.  I feel like this after every room that we complete.  I also feel like how could I even muster up the energy and effort to do another room.  And then, as time wears on, like I imagine most marathon runners experience, you get the urge. You crave the adventure. You start again.


Blogging tips